Design and Construction of a Remote Controlled Fan Regulator
Abstract
The paper presents a simple design and implementation of a remote controlled fan regulator. It enables the user to operate a fan regulator from approximately 10 meters away. The remote transmits a tone using an infrared light-emitting diode. This tone is decoded by a receiver, since the receiver only switches when the tone is received. The system was broken down into simpler functional blocks namely; infra-red transmitter, infra-red sensor, signal amplifier, control logic, sampler, control stepper, output control logic, load and display unit. Details of each subunit are described in the paper.
Keywords
Infra-red, Control, Receiver, Transmitter, Display
Introduction
Remote control facilitates the operation of fan regulators around the home or office from a distance. It provides a system that is simple to understand and also to operate, a system that would be cheap and affordable, a reliable and easy to maintain system of remote control and durable system irrespective of usage. It adds more comfort to everyday living by removing the inconvenience of having to move around to operate a fan regulator. The system seeks to develop a system that is cost effective while not under mining the need for efficiency.
The first remote control, called “lazy bones” was developed in 1950 by Zenith Electronics Corporation (then known as Zenith Radio Corporation). The device was developed quickly, and it was called “Zenith space command”, the remote went into production in the fall of 1956, becoming the first practical wireless remote control device [1].
Today, remote control is a standard on other consumer electronic products, including VCRs, cable and satellite boxes, digital video disc players and home audio players. And the most sophisticated TV sets have remote with as many as 50 buttons. In year 2000, more than 99 percent of all TV set and 100 percent of all VCR and DVD players sold are equipped with remote controls. The average individual these days probably picks up a remote control at least once or twice a day.
Basically, a remote control works in the following manner. A button is pressed. This completes a specific connection which produces a Morse code line signal specific to that button. The transistor amplifies the signal and sends it to the LED which translates the signal into infrared light. The sensor on the appliance detects the infrared light and reacts appropriately.
The remote control’s function is to wait for the user to press a key and then translate that into infrared light signals that are received by the receiving appliance. The carrier frequency of such infrared signals is typically around 36 kHz [3]. Usually, the transmitter part is constructed so that the transmitter oscillator which drives the infrared transmitter LED can be turned on/off by applying a TTL (transistor-transistor logic) voltage on the modulation controlled input. On the receiver side, a photo transistor or photodiode takes up the signals.
The approach used in this work is the modular approach where the overall design was broken into functional block diagrams, where each block in the diagram represents a section of the circuit that carries out a specific function. The system was designed using 9 functional blocks, as shown in the block diagram Figure1
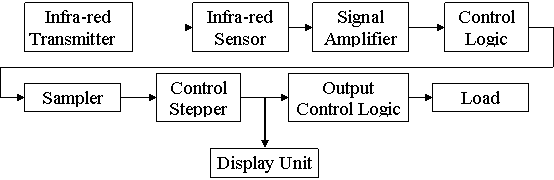
Figure 1. System block diagram
System design and analysis
Transmitter
The remote control device has the task of sending the infra-red signal, which is received by the infra-red sensor. It’s mode of operation can be better understood through the circuit diagram shown in Figure 2.
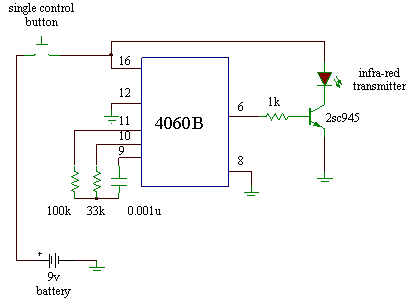
Figure 2. Circuit of remote device
At the application of voltage from the 9v battery or when the single switch is closed, the 4060B oscillator IC [2], produce high and low signals on pin 6, which is feed across the base of the 2sc945 NPN transistor [6]. When the output from the oscillator is high, there is a high voltage across the base of the NPN transistor, which turns it on. This permits the infra-red emitting diode to be grounded, resulting in the emission of an infra-red ray. When the output from the oscillator is low, there is a low voltage across the base of the NPN transistor, which turns off the switching transistor. Resulting in no emission of any infra-red ray from the infra-red emitting diode.
The 4060B oscillator IC produces a stream of pulses at a frequency determined by the RC configuration on pins 11, 12 13. The frequency of oscillation is given by [4, 5]:
f1 = 1/(2.3·R·C), where R = 33·103 Ω and C = 0.001·10-6 F
f1 = 1/(2.3·33·103·0.001·10-6) = 13.18 KHz
The pulse is connected to the base of the switching transistor (NPN 2SC945) through a 1kΩ resistor. The pulse determines frequency on the infra-red beam, such that it’s detection by the sampler would be possible.
Detection
Infra-red sensor and signal amplifier: The signal from the infra-red transmitter is divided to an infra-red sensor. The sensor converts the infra-red energy into corresponding electric current. The current from the sensor diode is weak and needs extra amplification. The four stage NPN transistor amplifiers boost the intensity of the signal to a reasonable level.
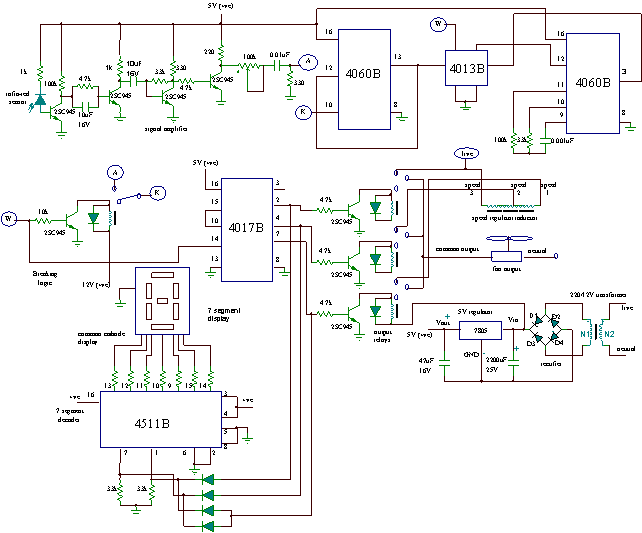
Figure 3. Circuit diagram of the detector
The output is fed out to a connected RC filter. Such that any reasonable distortion is simple is simply removed from the signal. The signal is connected to the input of a breaking relay. The relay is designed to switch off for sometime after the signal has being sampled by the sampler. The cutoff technique eliminates any distortion or errors coming along with the transmitted signal.
Sampler
The sampler recognizes the input signal through a high logic level at its pin 13. The incoming signal sets the input latch of the sampler and  changes to a high logic from a low logic. And
 , low. The input logic 4060B is designed to reset the input latch automatically. This is to allow another input response. The point is connected to the point W and also connected to clock input of the control stepper.
Control Stepper and Display Unit
The control stepper is designed to control the switching of the control relays. The control stepper has three active outputs. The output directs some codes to the 4511B (7 segment decoder) through corresponding or related diode which behave like read only memory (ROM). The output of the display decoder visually defines the code on the seven segment display. The link is done through 270 Ω current limiting resistors.
Control Unit
The control unit mainly embodies three relays. Each of such receives command from the control stepper. The relay selects a specific terminal from the speed regulator inductor. The effective inductive reactance of the selected portion of the transformer adds in series to the fan. So that there is a voltage drop across the fan and therefore, the speed is altered. At the highest speed the fan is directly connected to the full A.C. mains supply. And at the lowest speed, there is a high value inductor in series with the load.
The Power Section
It holds a 220/12V transformer, a filter capacitor (2200µF 25V) and a 5V regulator. The relays are supplied by a 12V supply from the rectifier. And the regulated 5v supply from the 7805 is used for the main circuit.
4017B
The 4017B is a 5-stage divided-by-10 counter with ten decoded outputs and a carryout [2]. The counter is cleared its zero count by a logical “1” on their reset line. This counter is advanced on the positive edge of the clock signal when the clock enable signal is in the logical “0” state. Its configuration permits medium speed operation and assures a hazard free counting sequence. The ten decoded outputs are normally in the logical “0” state only at their respective time slut. Each decoded output remains high for 1 full clock cycle. The carryout signal completes a full clock cycle for every ten clock input cycles and is used as a ripple carry signal to any succeeding stages.
It consists of two identical independent data-type flip-flops. Each flip-flop has an independent data, set, reset, and clock inputs and Q and Q outputs. These devices can be used for shift registers and SR flip-flop applications. The SR configuration is used in the circuit merely by grounding the clock and data inputs. The device has a medium speed operation.
This integrated circuit is designed to convert binary coded decimal inputs into equivalent display pattern, for instance a 4-bit code of 0010 is converted to a 7-segment display, a visual information or the digit of 1 is seen through the formation of the related light emitting diode (LED) that make up the display.
The input pins are 7, 1, 2 and 6. And pins 3 and 4 are the control terminals, which are always connected to the positive side of the power supply. The latch terminal, pin 5 is normally grounded. The output pins 13, 17, 11, 10, 9, 15, and 14 are connected to the terminals a, b, c, d, e, f and g of the 7-segment display.
Construction and testing
To ease the construction procedures, the circuitry was segmented into functional blocks. The constriction included a prototype located on a breadboard followed by the final construction located on a Vero board. On completion of the construction, a thorough test and assessment of the component connection were carried out.
The following steps were followed:
· The continuity and connectivity were taken using a multimeter while the circuit was not powered;
· The construction was tested block by block;
· The measurement of capacitance, current, resistances and voltage were taken and compared with design values.
· To operate the circuit, the switch, is held down while pointing the LED at the receiver.
The aim is to design a remote control that is portable in size and a receiver that responds only to the infra-red signal transmitted by the remote control. The system responds favorable and automatically changes the fan speed. The receiver-transmitter maximum distance is approximately 10m; this is the range of the transmission of the infra-red diode used. It was noted that the receiver unit was able to receive signal propagated of the distance within the range.
Conclusions
One of the primary objectives of an engineer is to endeavor to deliver the best product or the most efficient services at the lowest cost to the end user. The system has being tested and was found to meet the expected results.
The aim of this work was to design and construct a remote control for a fan regulator, and the system has thus accomplished that. The remote control device sends an infra-red beam, which is received by the infra-red sensor on the regulator, the display on the regulator indicates a change in fan speed and the fan also increases in speed.
Recommendation
The remote controlled fan regulator was developed using infra-red. This posed its difficulties and gave certain limitation i.e. the infra-red sensor could not filter out surrounding bright light. Engineers trying to improve on this should work towards perfectly filtering out bright light so that only the infra-red rays are incident on the infra-red sensor. The power supply could be improved, where a step-down would not be used, thereby reducing the entire size of the project. Similarly, micro soldering could also be used in order to further reduce the size of the equipment.
References
[1] Howstuffworks [Internet]; ©1998-2006 HowStuffWorks, Available at: http://www.howstuffworks.com/.
[2] Datasheet Search System [Internet]; ©2003-2006 Alldatasheet.com, Available at: http://www.alldatasheet.com/.
[3] Forrest M. Mims III, Engineer’s Mini Notebook, Volume I. Timer, Op Amp & Optoelectronic Circuits & Projects, 1st Ed., Master Publishing, 1986.
[4] Theraja B.L., Theraja A.K., A text book of electrical technology, Ed. 21st, Publisher; publication of division of Nirja construction and Development co., Ltd. Ram Nagar., 1994.
[5] Horowitz P., Hill W., The art of Electronics, 2nd Ed., Cambridge University Press, U.S.A., 1995.
[6] Amos S.W., James M. Principles of transistor circuit: Introduction to the Design of Amplifiers, Receivers and Digital Circuits, 6th Ed., Hartnolls Ltd., 1981.


Tiada ulasan:
Catat Ulasan